This document introduces the key features offered by the MINT ARM Enterprise Solution platform. It provides a comprehensive overview of the platform's capabilities at a high level.
This document is structured by the available modules on the platform. Each module includes a description, a list of key features, and a workflow overview. Where required, additional sections are included.
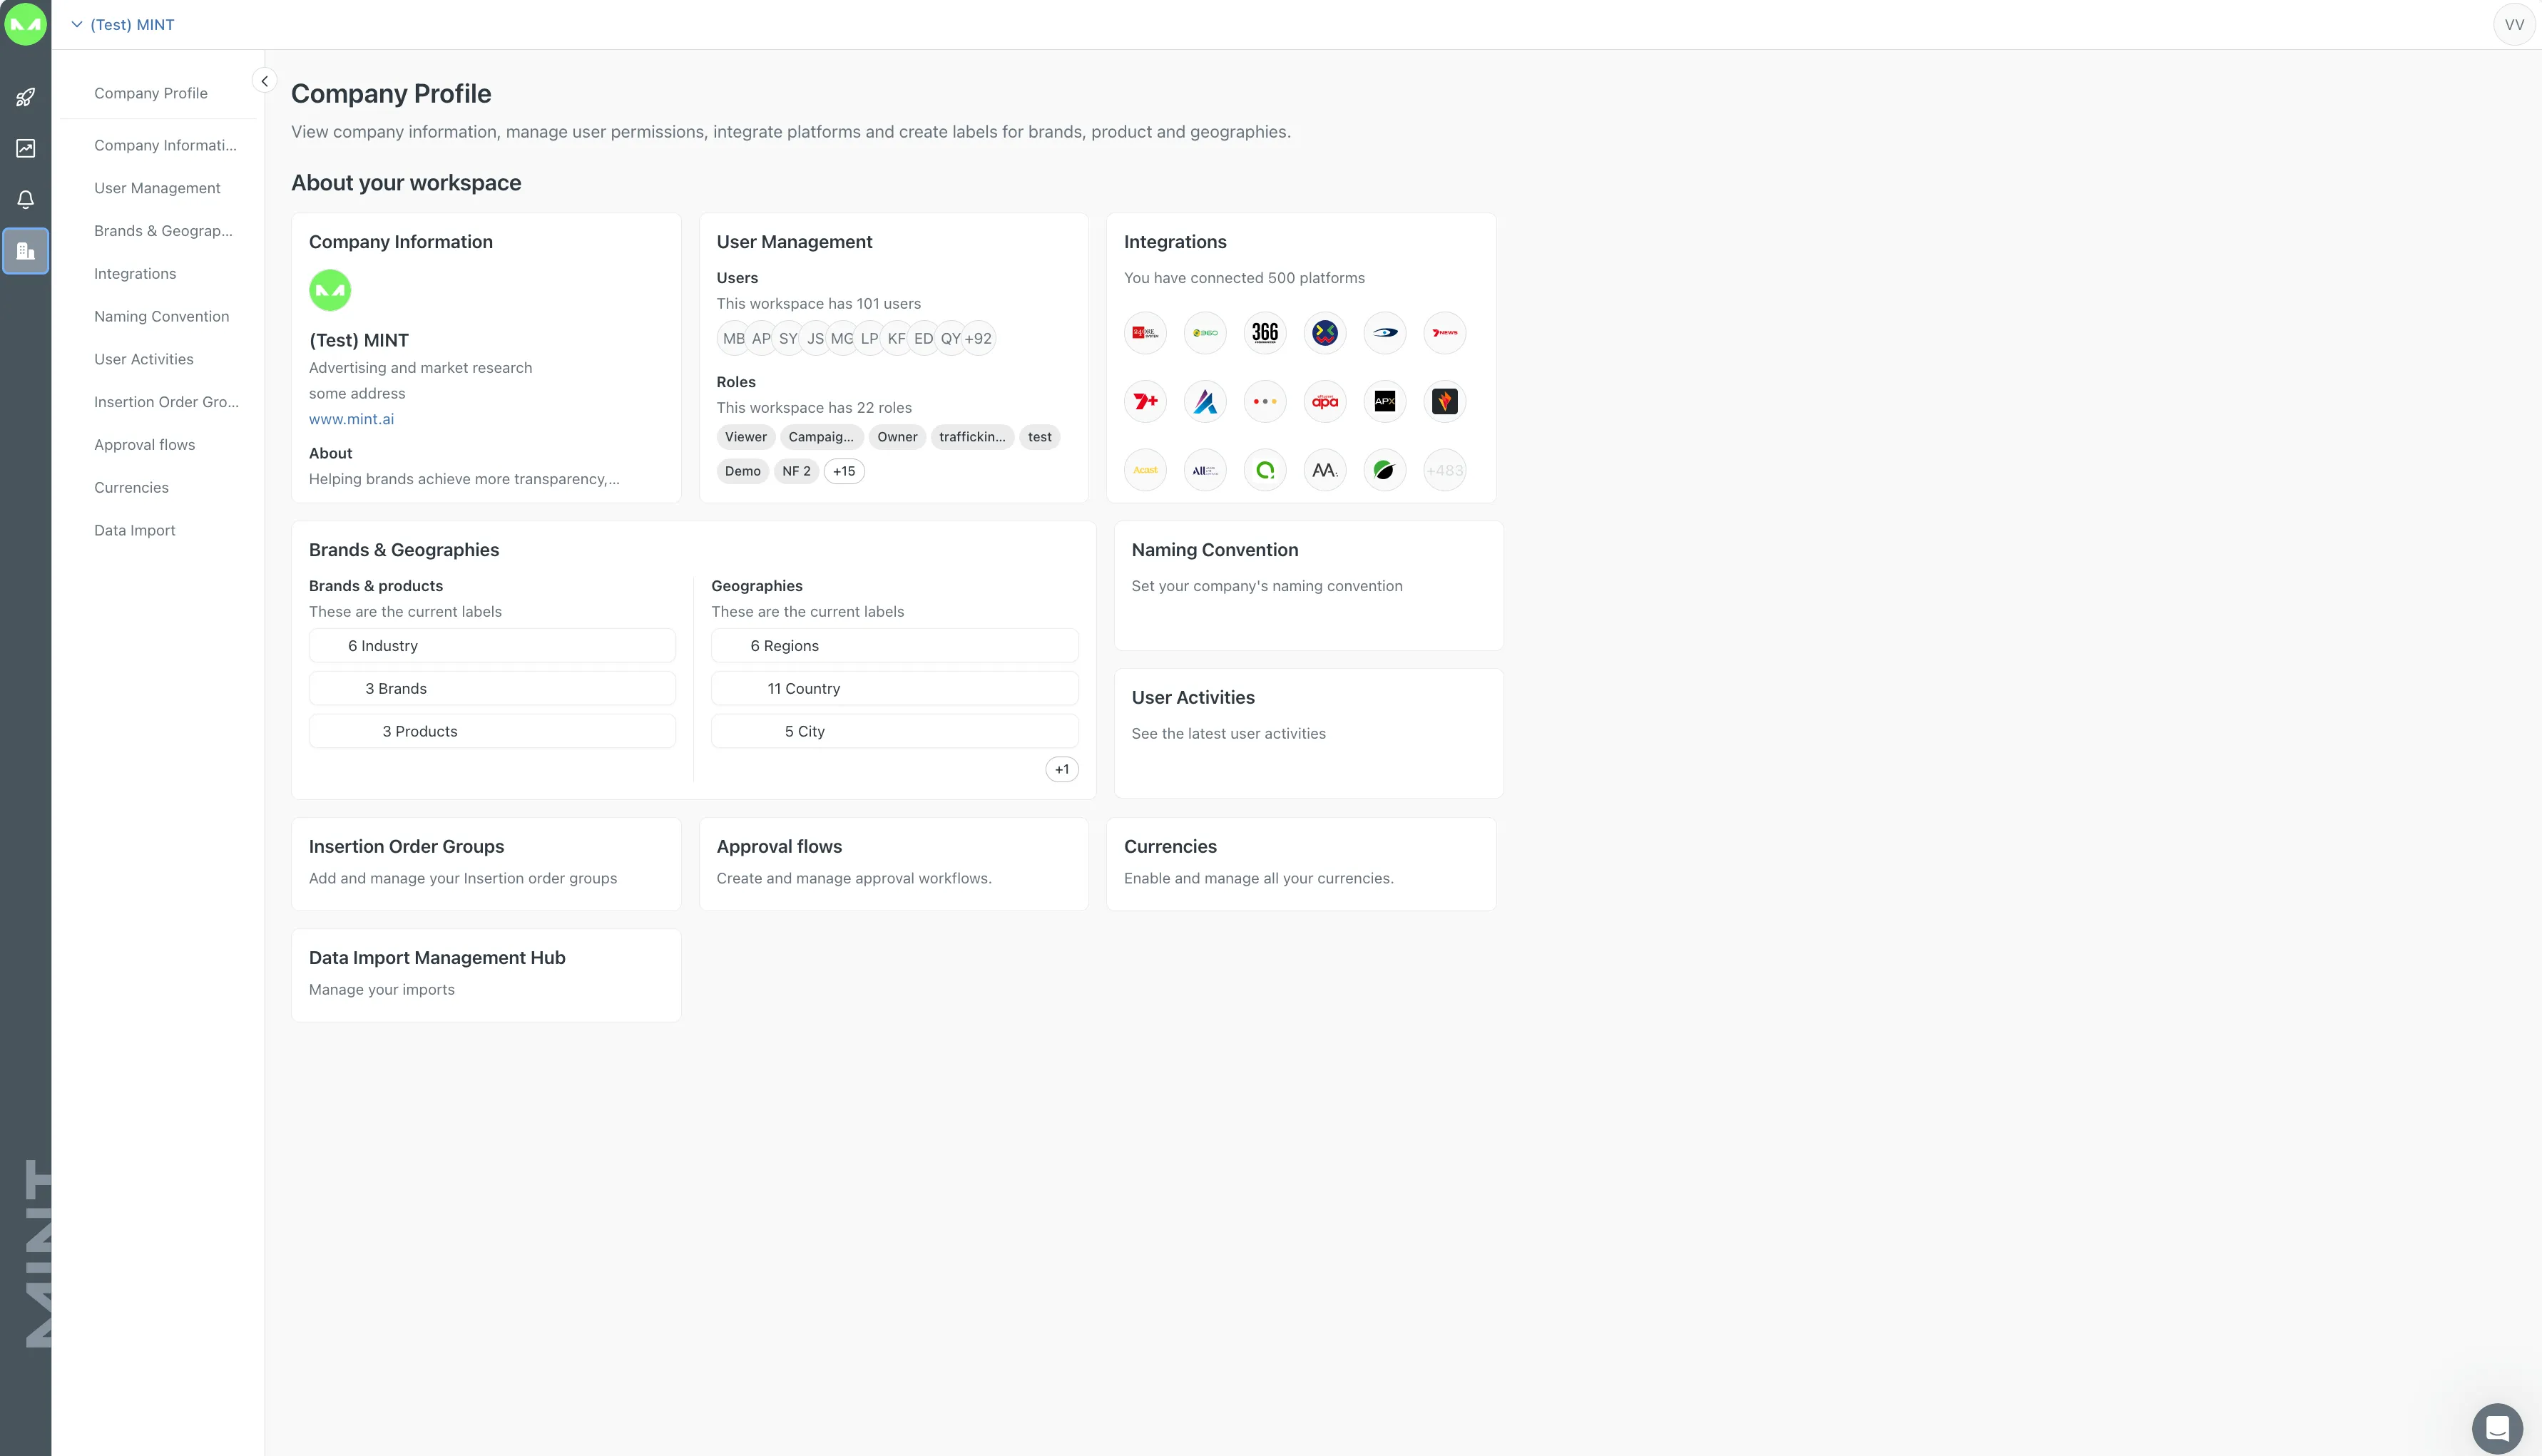
The Company Profile is where all the related company information can be added. The module is divided into several sections: Company Information, Brands & Geographies, Users Management, Integrations, Naming Conventions, User Activities, Insertion Order Groups, Approval flows, Currencies, and the Data Import Management Hub. The company profile page can be accessed by clicking the ‘profile’ icon at the bottom of the left-hand menu bar. On the left side, a menu with all the different sections for this module is displayed and can also be hidden by clicking on the small arrow icon to have a full view of the page. The page will display some cards with an overview for each of the sections mentioned above.
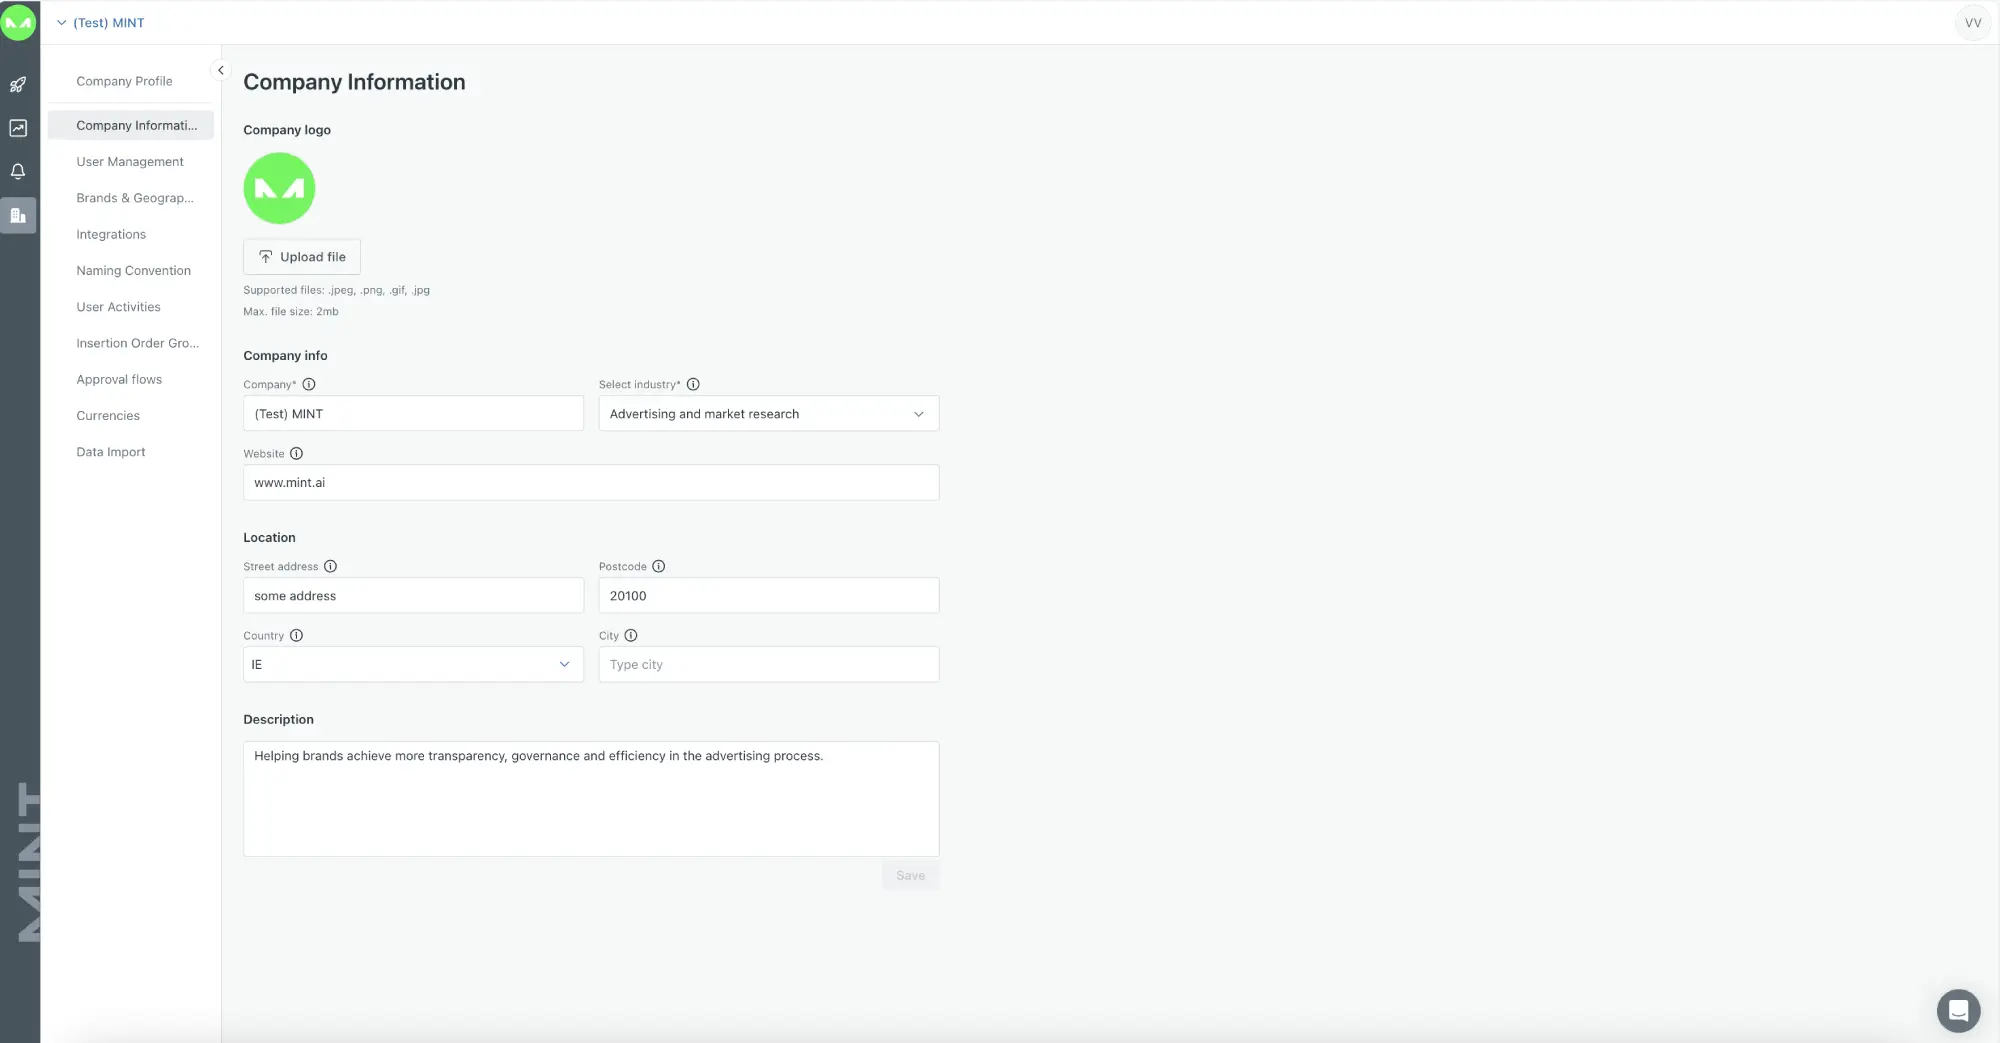
This section provides a comprehensive overview of the company. It can be filled in with all your Company details, such as Logo, Company name, Industry, Website URL, HQ address, ZIP code, and Description.
The User Management area contains an overview of all Users included in a company and the possibility to create or edit existing Users. There is also the Roles section where roles can be created and permissions can be defined for the specific User.
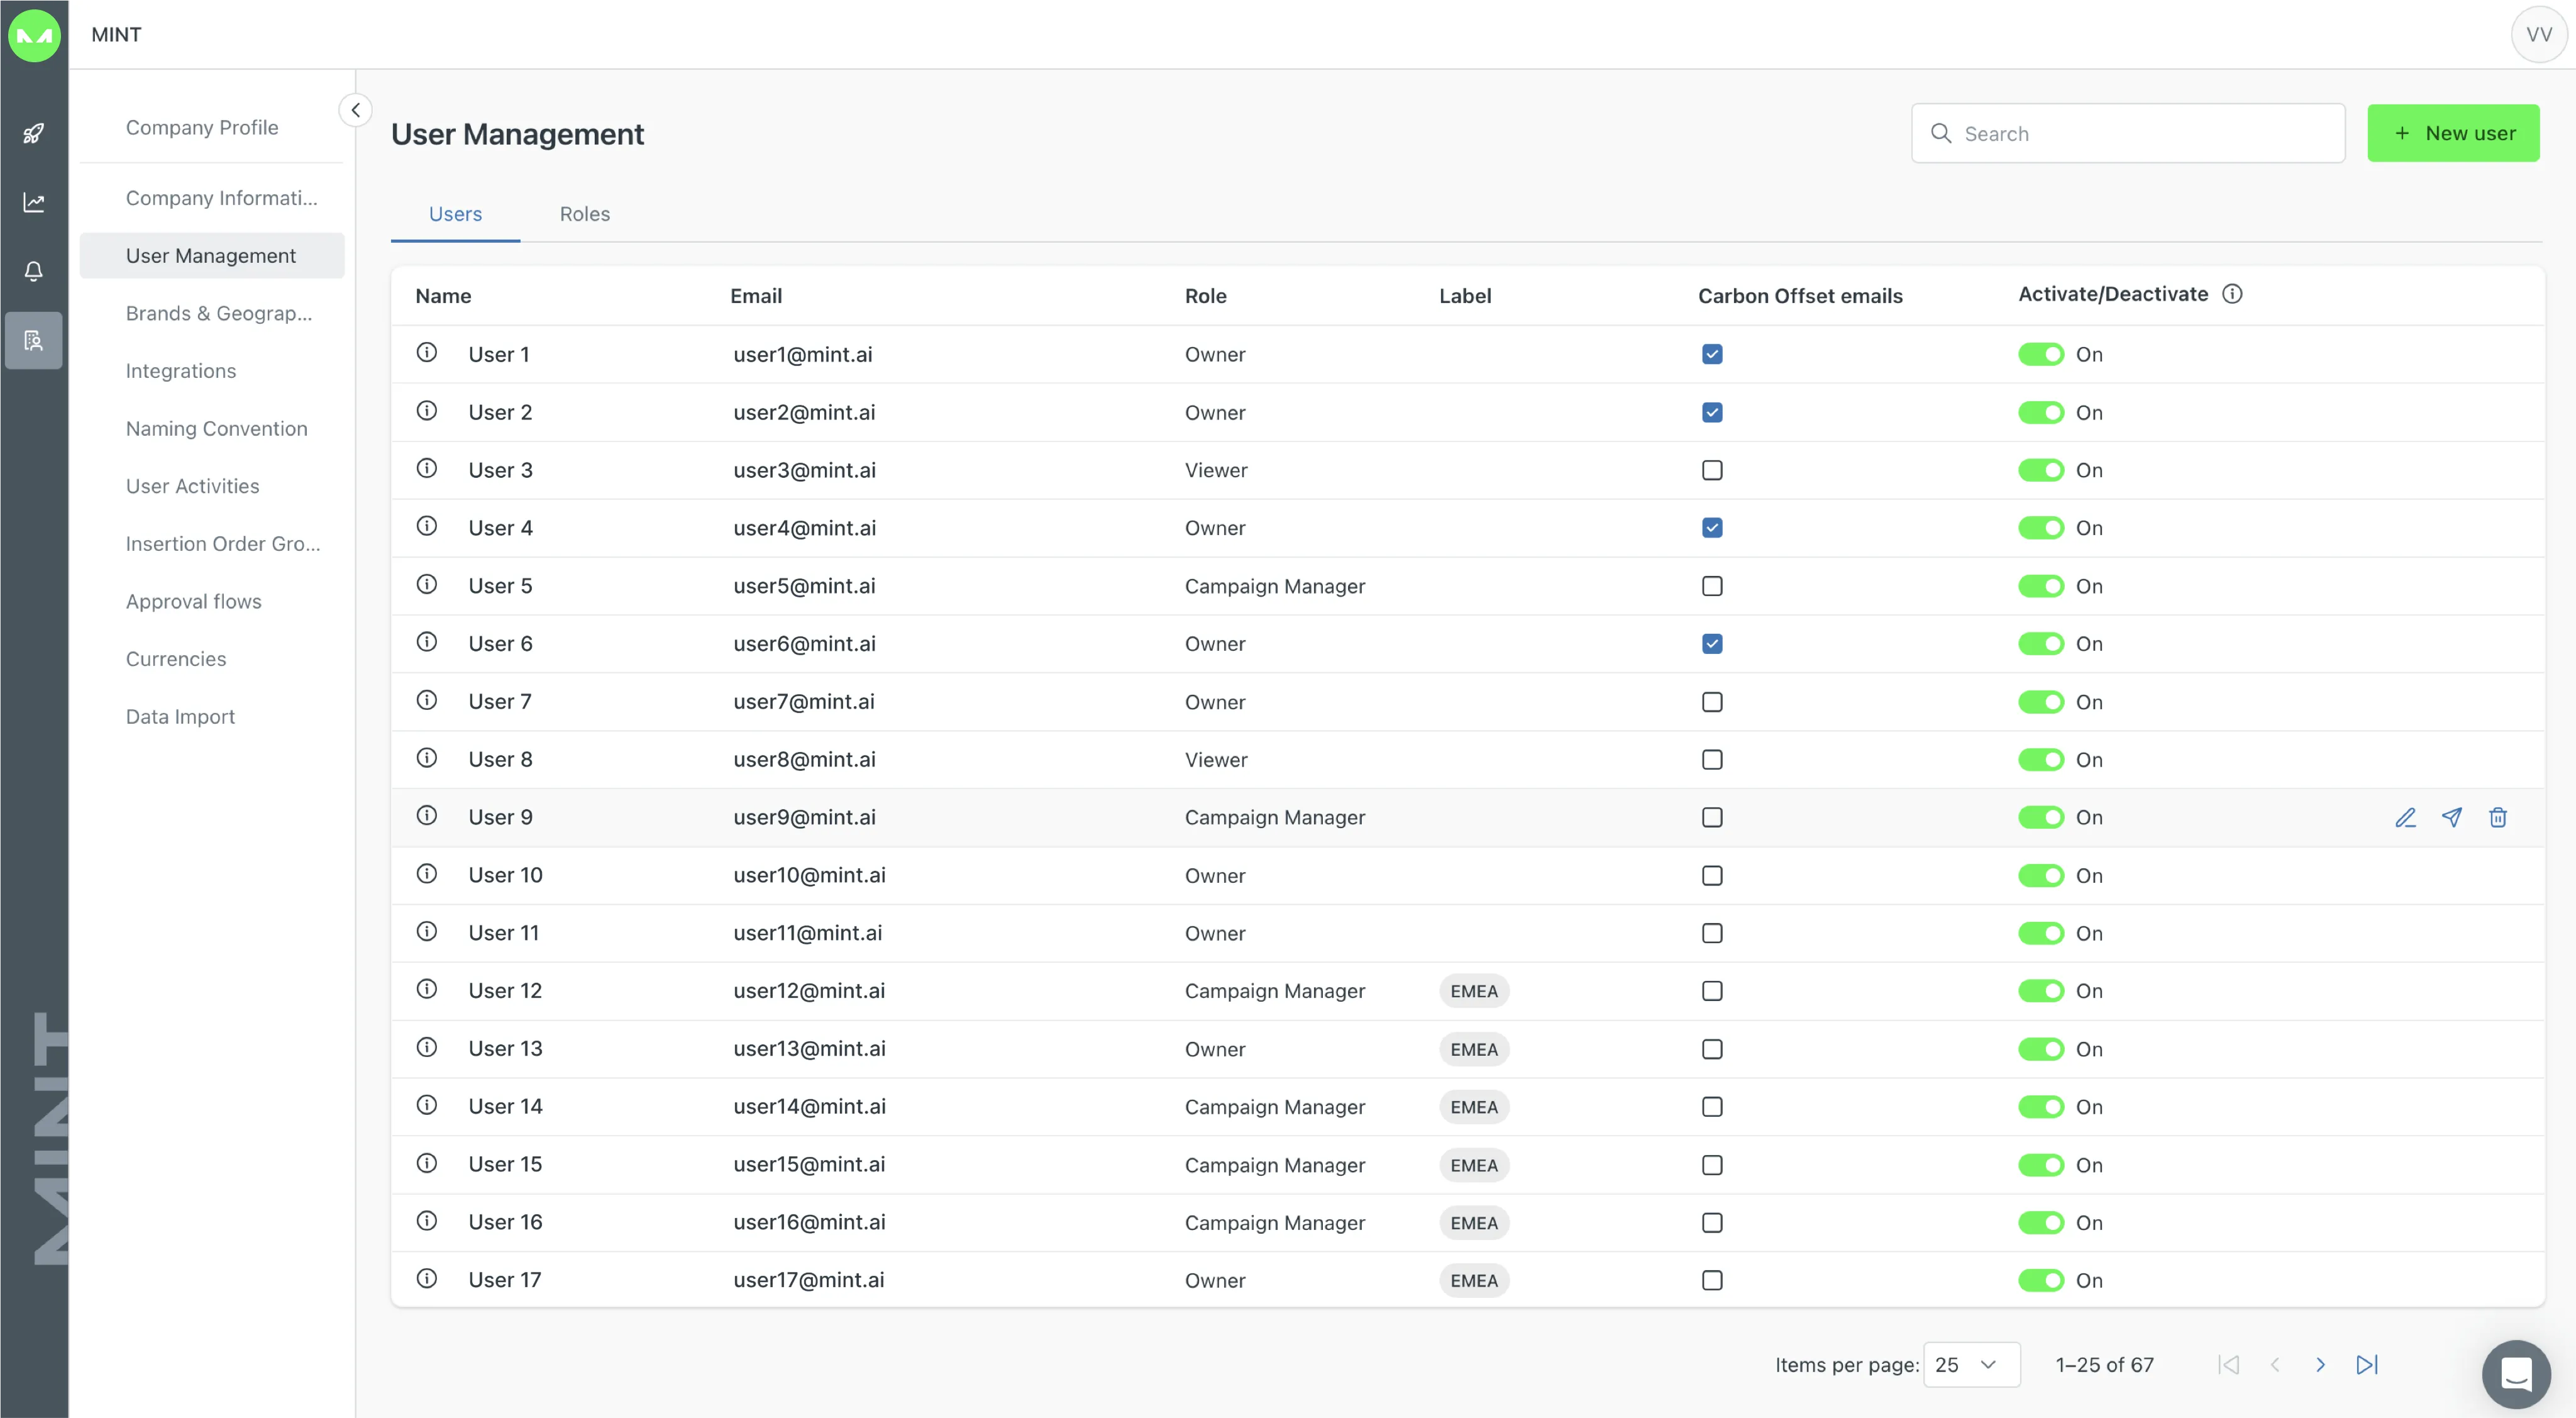
Users and Role permissions are managed in the table below. There are three options for users permissions: ‘No access’, ‘Read Only’, and ‘Read and Write’.‘
'No access’ denies access to a given platform area while ‘Read Only’ allows users to read the campaigns and their data. Then ‘Read and Write’ allows full reading and editing access to the campaigns.
An admin user can manage the permissions for all users, allowing or denying access to all areas of the campaigns and platform as desired. For example, a user can access the Campaigns’ Planning and Configurations, but not the Reporting, or with "Read-only" permissions for Reporting. Ticking the box in the relevant column assigns that permission to the role. Tick a box in the header and all the rows underneath it will be selected too. A dashed box indicates a header row below which some, not all, permissions are selected. Click ‘Save’ to implement the role.

This area allows the Client to configure the Media AdTech Partner (MAP) they would like to use with MINT. Integrations include platforms, publishers, ad networks, ad servers, analytics, and brand safety. When a MAP is selected for integration, it will be made available within the modules for Planning, Campaign Configuration, Trafficking, and Reporting. These services are external to MINT, are offered by third-party providers, and require separate accounts. However, the advertising campaigns being run through these separate accounts can be managed through integration with MINT.
There are three types of integrations, each with its own set of features:
Two-Ways integration:
Identifiable with a purple icon of two arrows, a Two-Ways integration is connected via API, and MINT can read the data campaigns and add elements in the platform.
One-Way integration:
Identifiable by a blue icon with one arrow, a One-Way integration allows to retrieval of reporting data via API or scheduled reporting.
Virtual integration:
These are identifiable by a green icon with a dotted circle. This means that either the platform does not have an API integration, like a media or ad network, or that a direct integration is not yet available, but data can be ingested by using an ad server, analytics or import hub.

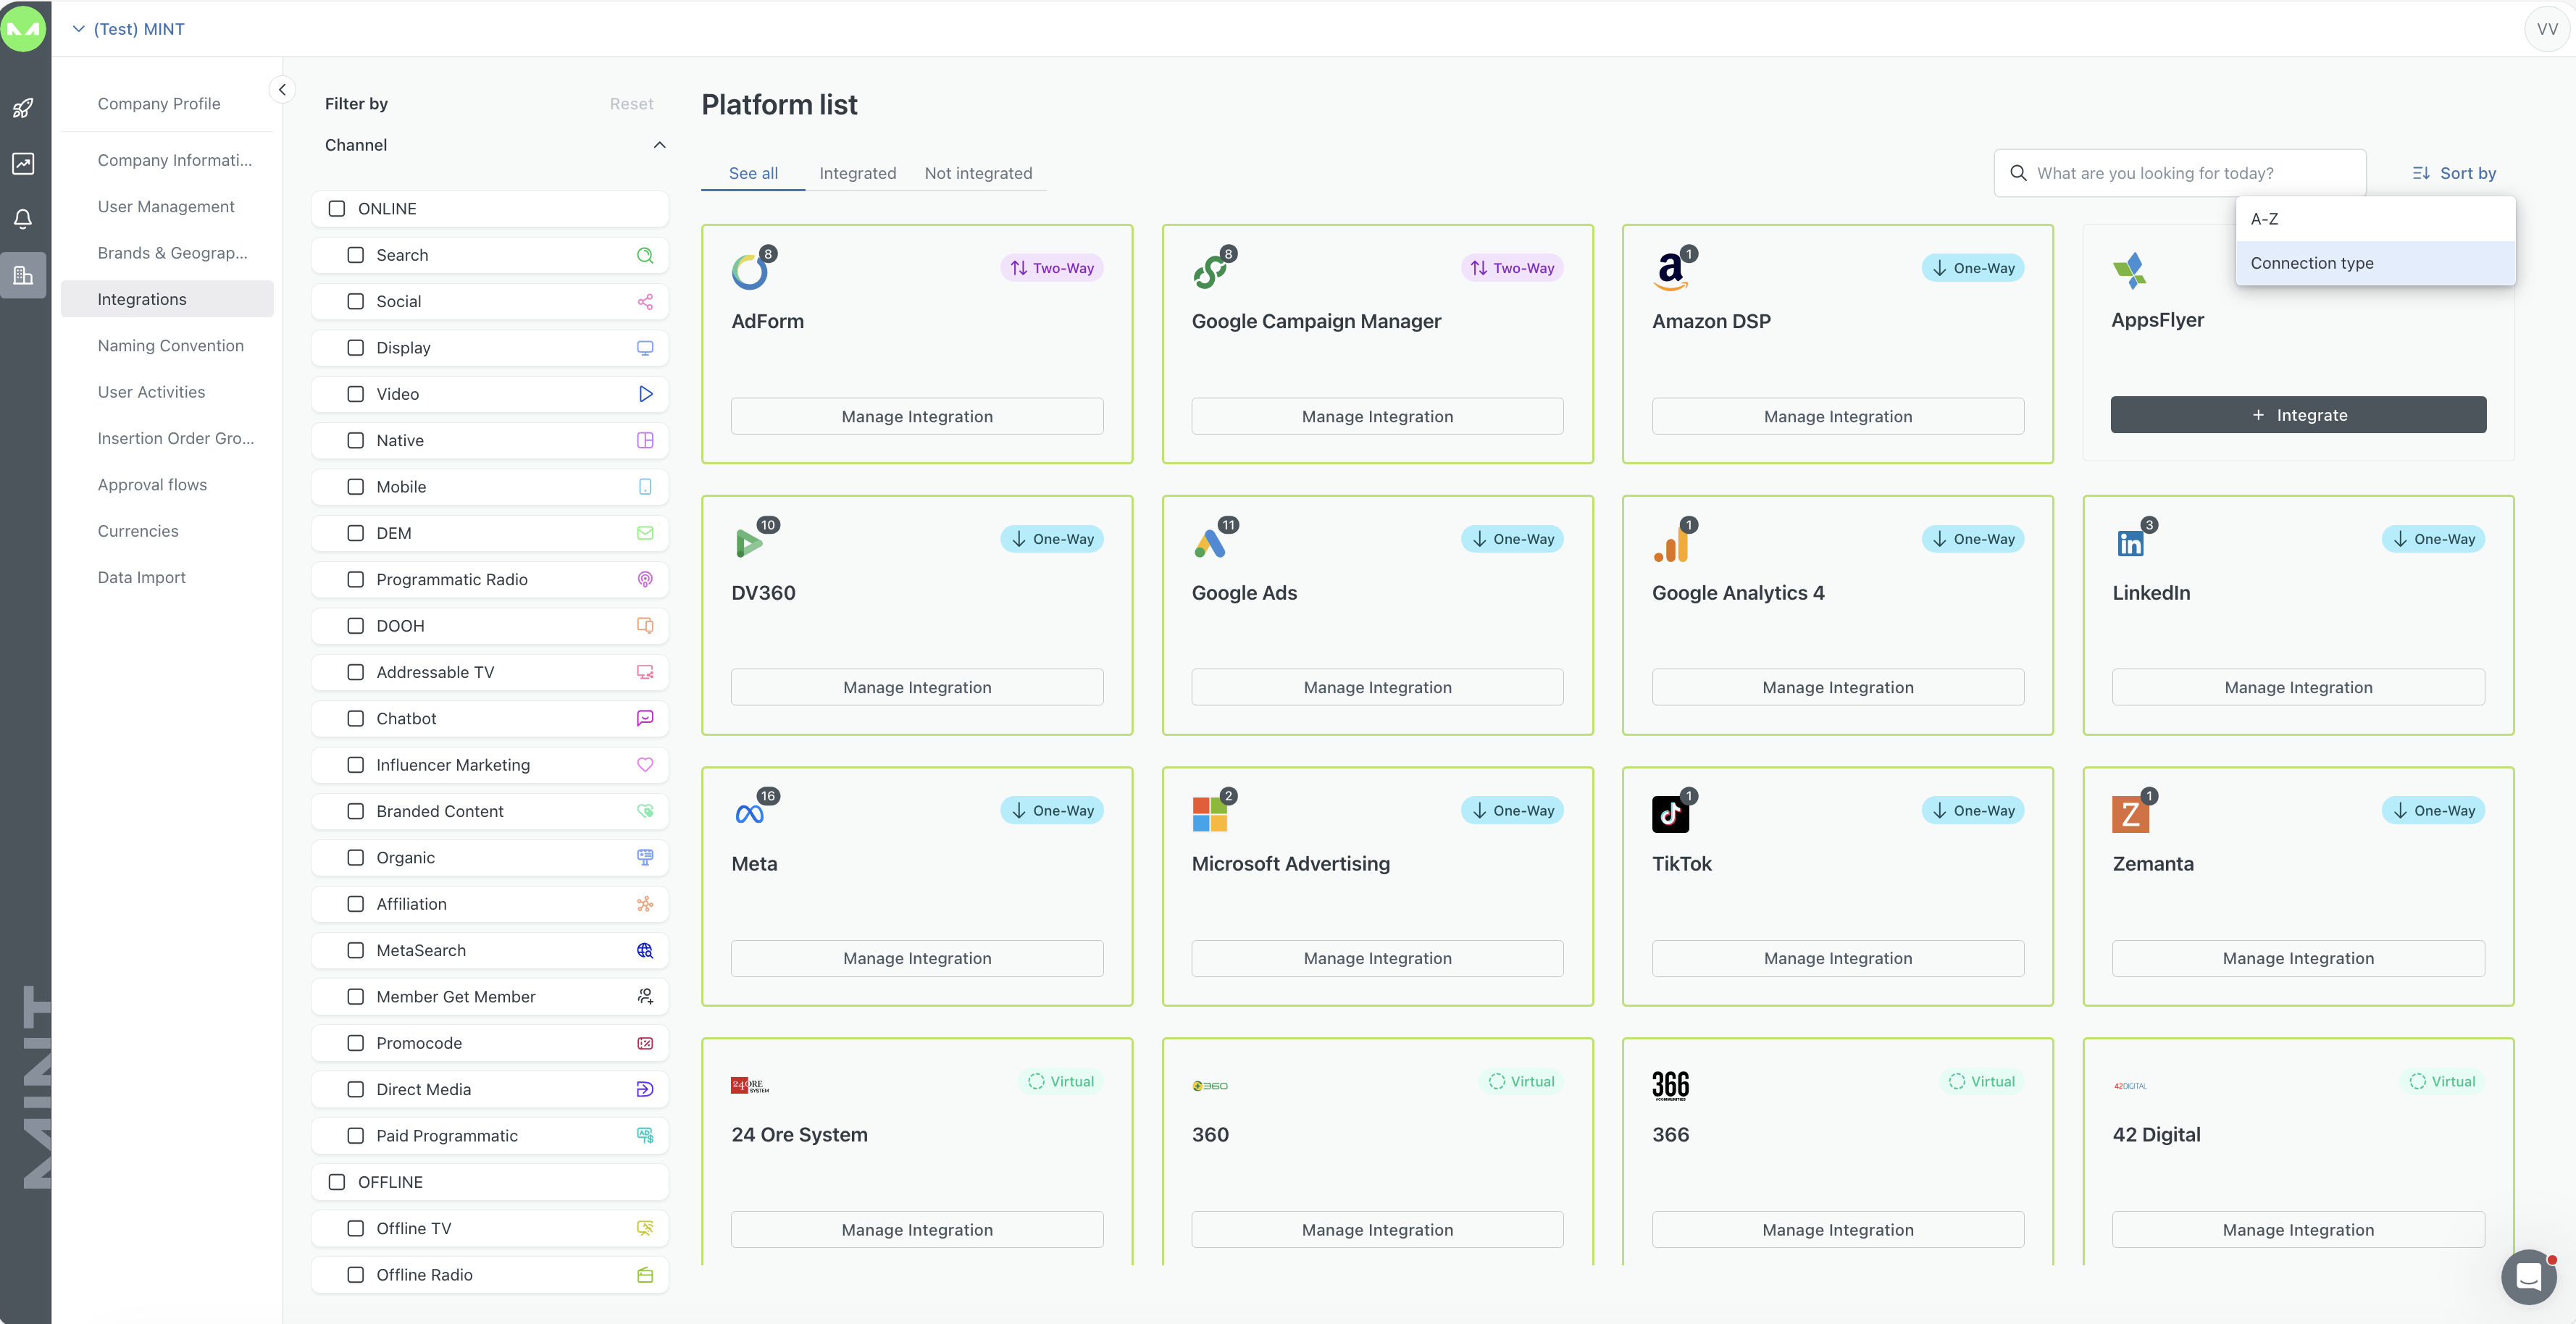
Independent of their type, all platforms can be used in the Strategic Brief, Media Mix, Buying Plan, Suggestions, and Reporting. In addition, for Two-Ways integrations, you can create elements in-platform or automate configuration. Despite the type of integration, the platform cards display the platform name, the logo, its category, and whether it is integrated into your account or if you have yet to add it.


On the top left of the page, you can filter the view by Integrated or Not Integrated platforms, or switch between pages. On the left, we have a list of channels and categories. You can search for a specific platform with the search bar at the top of the screen or filter the platforms by channel, for example, by Search, which produces the following view.
On the right-hand side, we have the Sort by option which can be alphabetical or by Connection Type.
While the Filter by option, allows you to choose in between a specific Category or Platform, in the following image the filter is applied by category to show only DSPs.

When an integration has been configured, the selected service will be made available within the modules of Buying Plan, Campaign Configuration, Trafficking, and Reporting. The Suggestions engine will also pick up the newly integrated service.
Here, you can find an up-to-date Integrations List.
Brands, Products & Geographies are meant to build a labels system that will be used across the platform to assign Campaign management permission to the desired users replicating the company Brands and Products structure, and their geographical locations. Likewise, are meant to correlate Campaigns to the respective brand and product for better organization and overall management.
To start adding the labels for your company, you will need to click on the “view” button to land on the dedicated page where you can start completing Brands & Products, then continue with Geographies.

There are four default columns divided into: Industry, Brands, Products, and Sub-products. You can add optional columns (up to 7) to recreate the company structure. You can also rename the columns, except the first one (Industry).
Likewise, in the Geographies section, you can do a similar breakdown considering the areas in which the company operates displaying for instance an overview starting from a region to a city.

Similarly to the first section, you will find four default columns but you can add additional ones or rename the current columns but the first one. Every item in every column needs to be completed before going into the other column in order starting from the first column. To add an item simply click on the "Add" button and type the corresponding name.
The Naming Convention contains a set of rules to define the name of each placement as seen in the Trafficking module. It allows the user to recognize all the information about one ad in one place.
The “Map to” column lists the elements that can be defined, where any number of elements can be defined in any order. Drag the rows by the dots to change the order. Each element corresponds to the identical element in the Planning Module.
The “Prefix” value column concerns text in the Naming Convention that automatically precedes each corresponding element in the Trafficking placement. The user can write a prefix of any length with any characters that will be automatically repeated before each element in the Trafficking placement.
The “Fixed Value” is a string of text input by the user that is pasted to the corresponding element in the placement, regardless of what is written in the corresponding column in the Planning module.
The “Default” value is the opposite of the fixed value. When a Default Value for an element is explicitly set in the Naming Convention, and in the Planning Module for the corresponding column the cell is empty, and the system automatically applies the Default Value to that empty cell in the Planning Module.
The “Separator” column defines the separator symbol between each element of the naming Convention and is defined by the user.You can delete elements from the Naming Convention by clicking the bin icon at the end of the row and saving your changes so they are no longer considered in the other modules.

The User Activities Page contains a registry with the changes implemented to the different campaigns by the different users. At the top of the screen, a date range or users can be chosen to filter the information shown on the registry. The table shows the user’s name and role, the date, time, and the description of the implemented change, for example, changing the allocated budget.

The Insertion Order group enables the creation of teams that ensure only authorized members can manage IOs, preserving confidentiality and organization. Members can view all IOs sent within their group while remaining unaware of those from other groups, thereby streamlining management and clarifying responsibilities. Users outside these groups may see IO options in the Buying Plan but cannot utilize them. To access and send Insertion Orders, you must belong to a designated Insertion Orders management group.

1.2.8 The Approval Flow
An Approval flow is a structured process used to obtain authorization for actions or requests in MINT where specifically pertain to the Buying Plan. The process involves submitting a request, having designated approvers review it, and then making a decision to approve, reject, or request changes. This ensures systematic decision-making and accountability while keeping a clear record of approvals
This page is divided into two sections: on the left, you'll see the structure mirroring the flow you're about to create, while on the right, you'll find the steps to complete it.
Flow creation: In this section, you will be able to select the Requestor and Approvers. For each approver, we can select specific users or roles that multiple users belong to. You can have up to 20 approvals.
.png)
.png)
The Data Import Management Hub lets you quickly map and import Excel data into MINT, making it ready for analysis in the Data Exploration module. It also includes tools to simplify file management: Performance Data Import lets you easily import your desired files, and includes a glossary and ready-to-use templates.

The Performance Data Import is a powerful tool that enables you to upload files at multiple levels, including Platform, media row, and placement folder ID. It supports one-way, two-way, and virtual integrations, allowing you to seamlessly manage data for specific campaigns and Buying Plans.
Additionally, the Glossary tab lets you build a personalized taxonomy by renaming platforms to match your specific needs. You can customize integrated platforms and assign up to 20 aliases per platform for greater flexibility. You will also find a Templates section, where all your saved templates are stored for easy access. The Auto Import feature is available as well, allowing you to seamlessly import performance data.
Custom Metrics
MINT's custom metrics allow tracking additional data beyond standard platform metrics. The custom metrics area serves as a registry, displaying all existing custom metrics and their details.
Users will be able to add, delete, and edit new custom metrics with the dedicated buttons. There is the possibility to add up to 80 custom metrics.
The Trusted Email tool allows you to manage approved email addresses for auto-import within a specific workspace. It is designed for external or system emails that are not added as workspace users but still need to be recognized as trusted.
.png)
The Currencies section allows you to create and manage currency details. While all users can view the data, only owners have permission to add or edit it. Users can add up to 10 main currencies and view exchange rates. The section displays both automatic and manual rates.

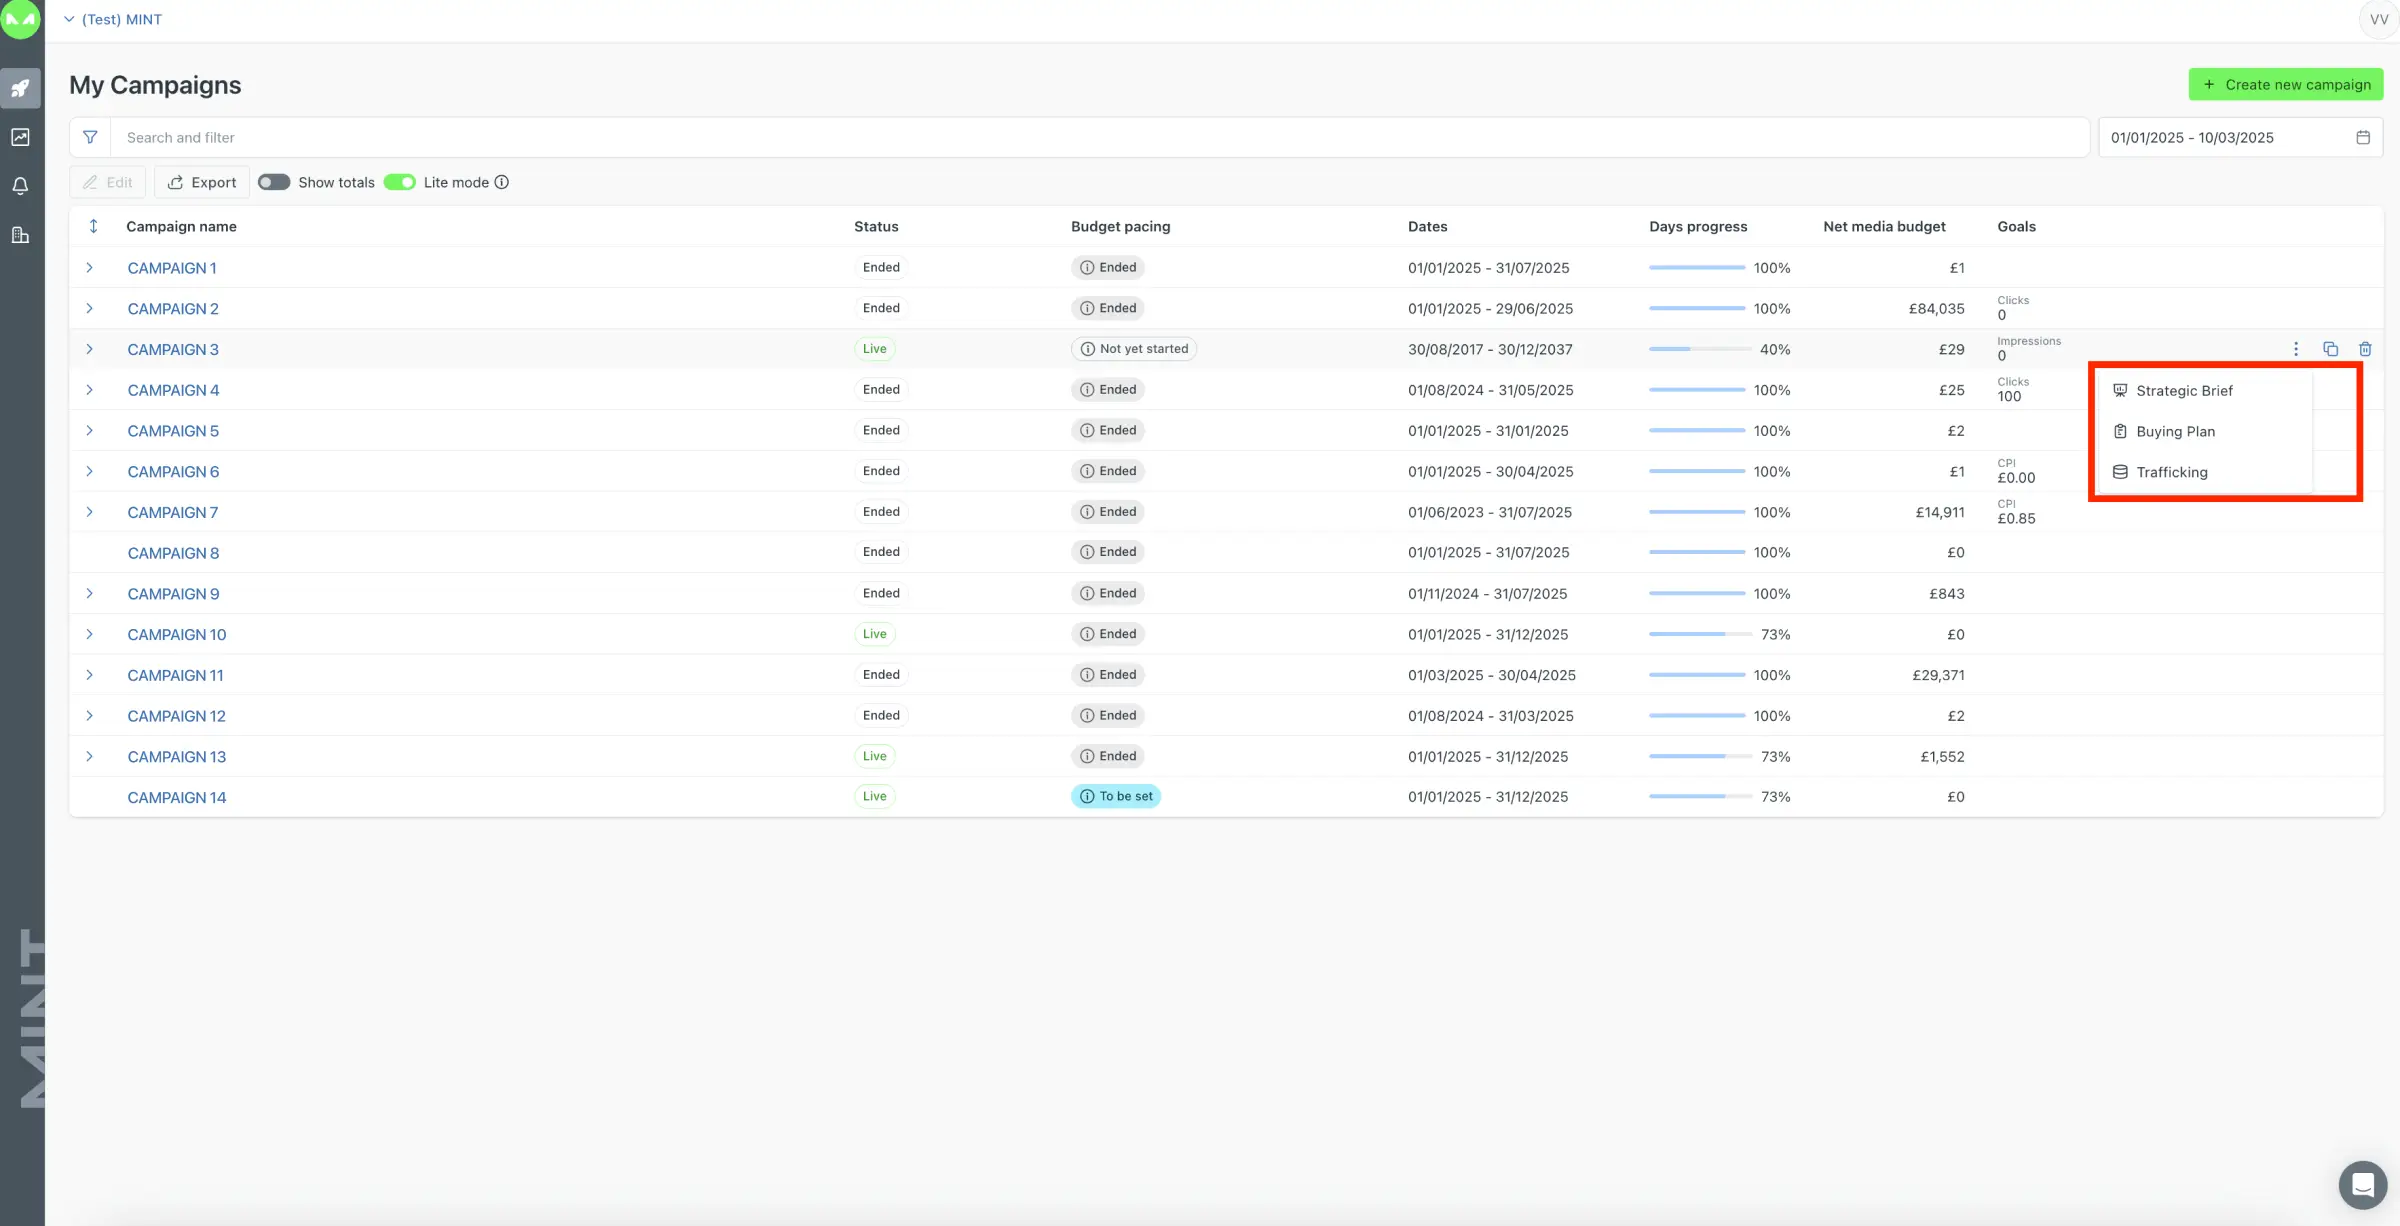
The "My Campaigns" page serves as the homepage for the platform, automatically displaying upon your entry. It offers easy access to all other modules and presents essential campaign details for a comprehensive overview.

The Strategic Brief is the starting point to define your campaign purpose and media mix strategy. A campaign contains different channel mixes for specific periods, for example, months, for which is also possible to create a specific media mix strategy.
Apart from defining the media mix strategy for campaigns and channel mixes, you can also add and manage KPIs for both to define goals for your general and specific strategies.
At the same time, you are now able to differentiate between online, offline or both types of advertisement to be used in a campaign. Depending on this selection, other areas of the platform will only provide information dedicated to each type of advertising. For example, if the campaign is classified as offline, only offline channels will be proposed in the Strategic Brief module and the corresponding platforms in the Planning module following the offline concept.
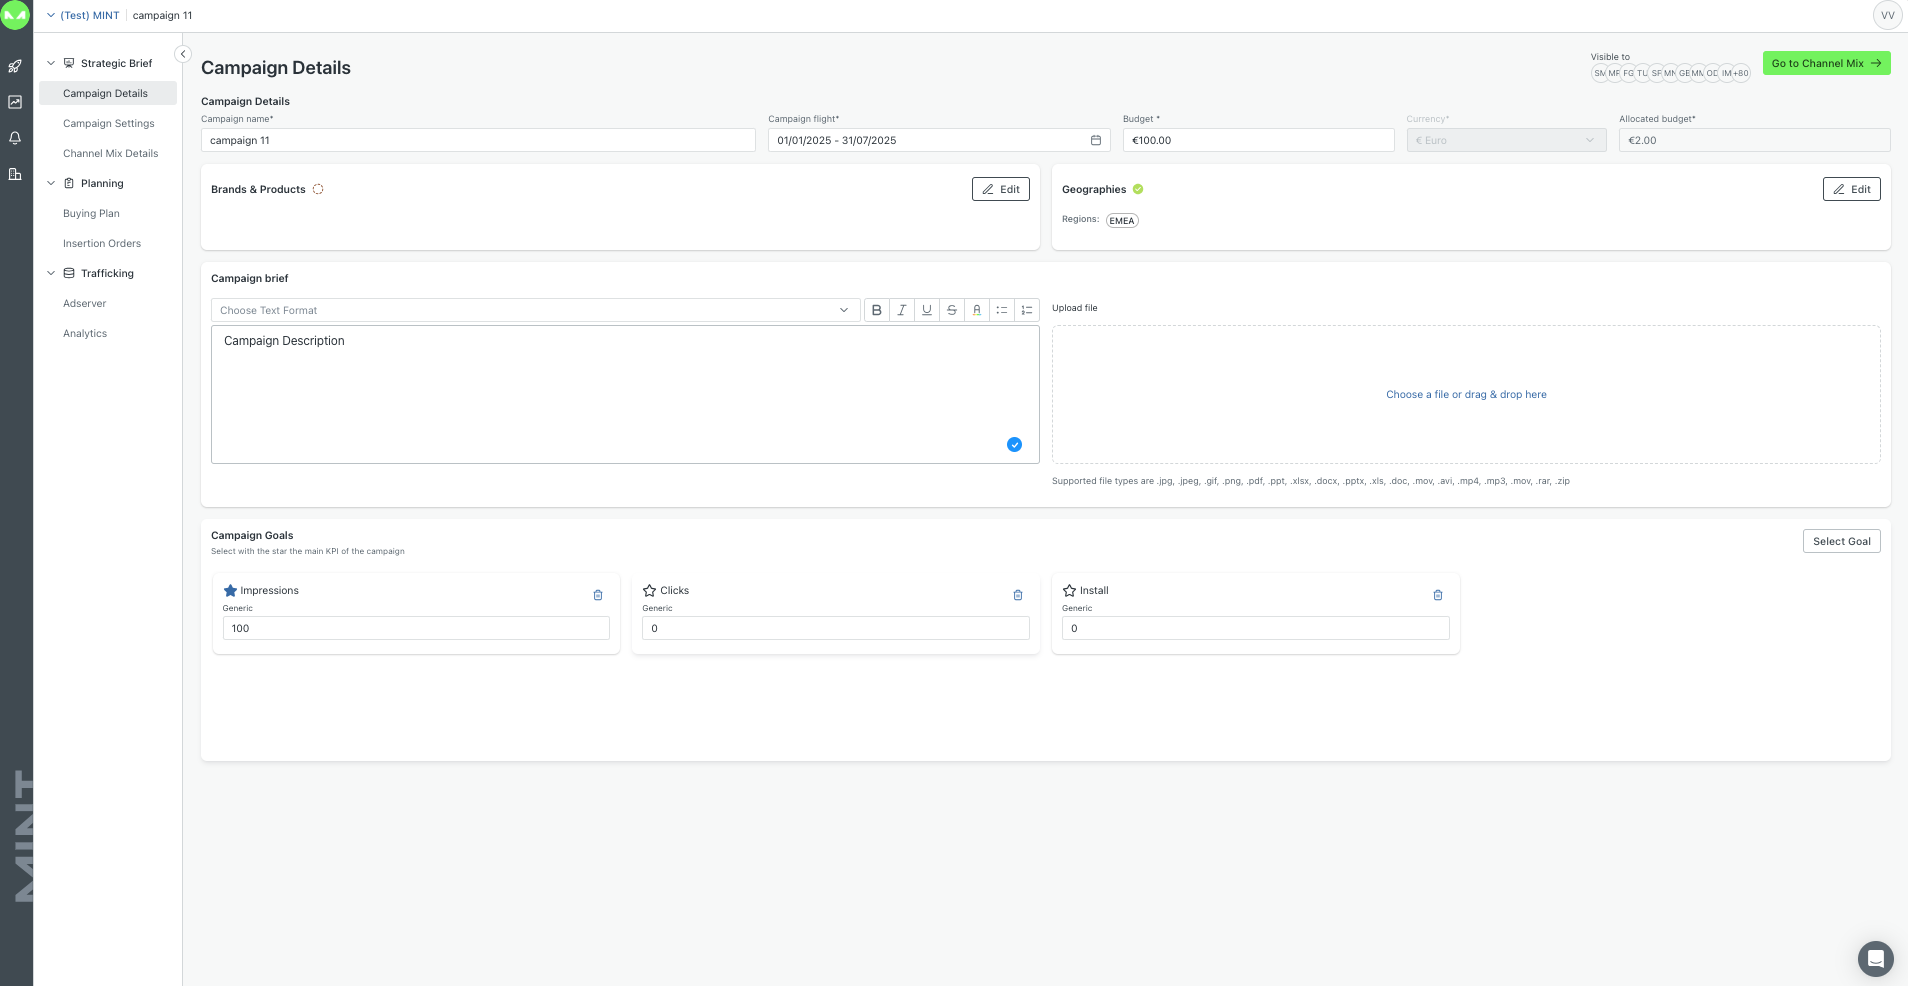
The module is split into the following sections: Campaign Details, Campaign Settings, and Channel Mix Details.
In this section, the goal is to provide useful information about the campaign to save it on the platform. You will need to add basic information such as the campaign name, dates, budget, and currency. Then relate some labels to it choosing to do it manually or automatically, this information is retrieved from the Brands & Geographies section in the Company Profile module.
Moreover, it is possible to add Goals differentiating among main Goal and complementary ones, before adding a campaign description explaining the purpose and what you would like to achieve. In this section, you can upload documents that further explain the campaign and that will be useful for any stakeholder that wants to know more about the campaign.
Lastly, consider that the basic information in the brief will be maintained across the campaign configuration process and displayed at the top of the screen to keep track of dates, budget allocation, and spending.
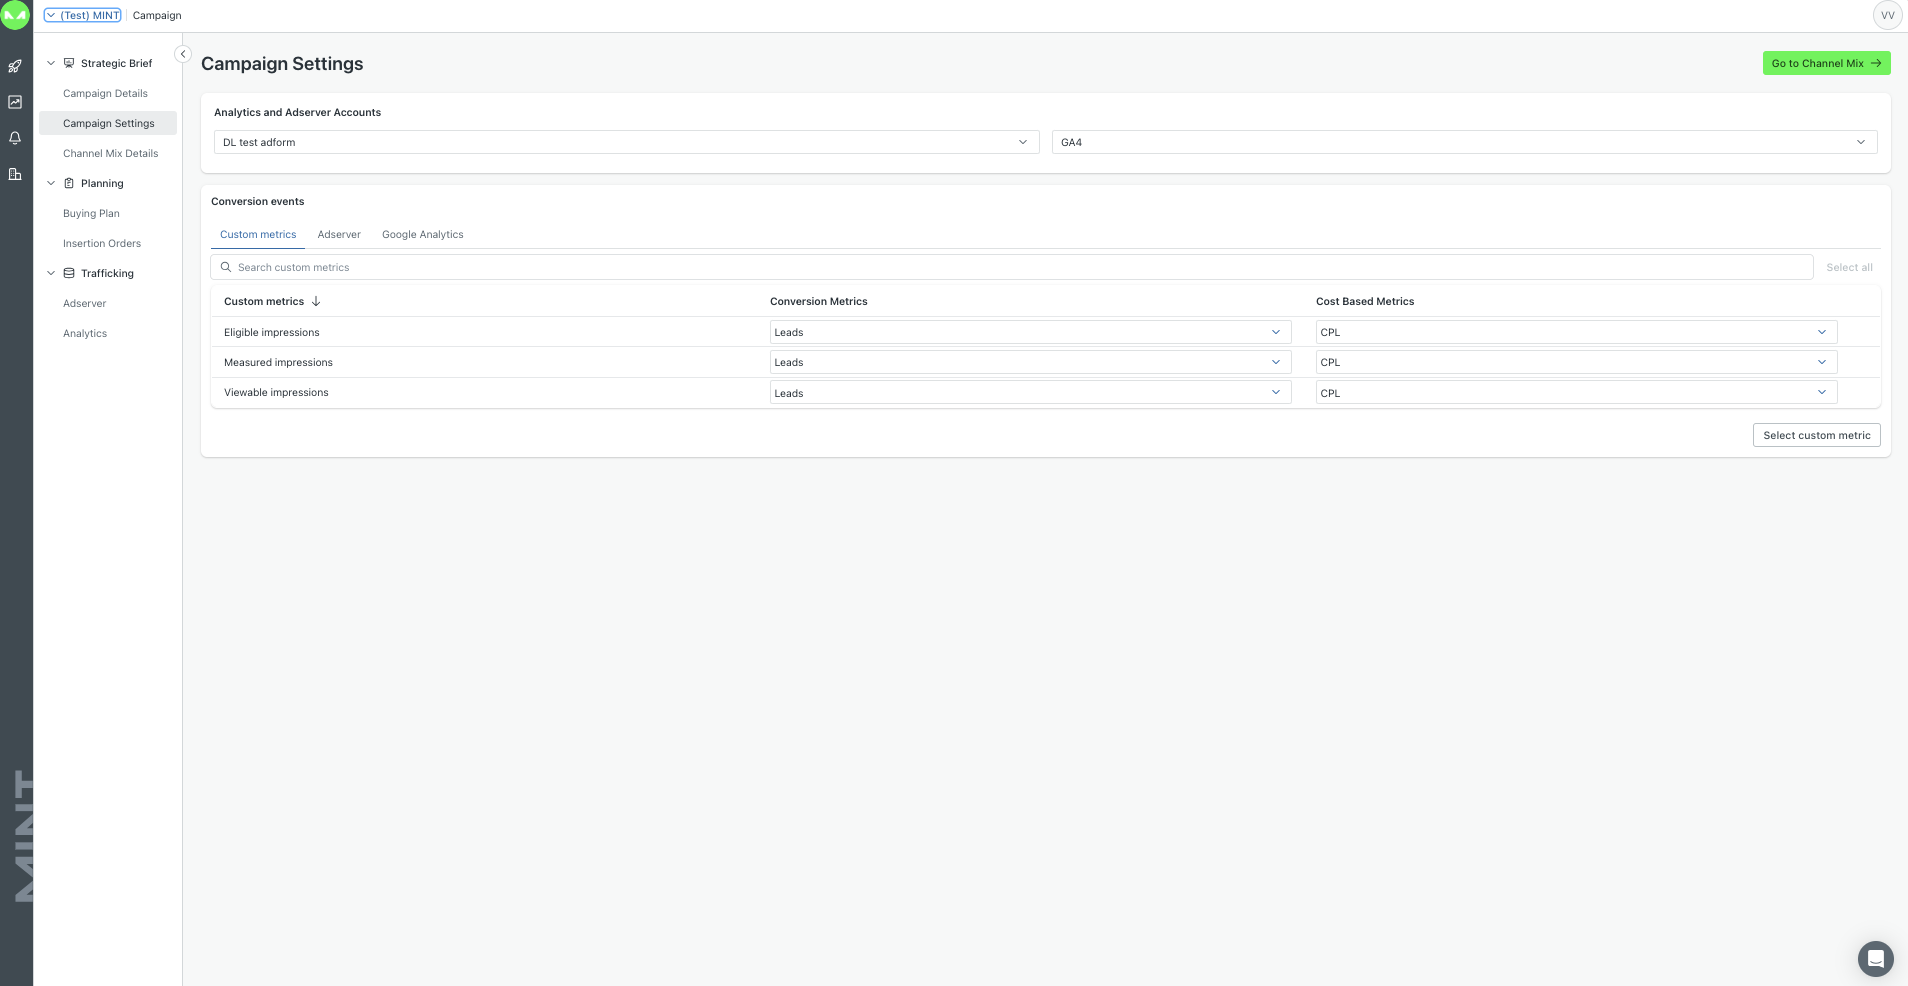
In this section, when you are setting up a new campaign, you need to define conversion events in the Campaign Settings section. Configuring conversions is crucial for tracking and viewing results on the Reporting page, irrespective of whether their origin is from Adserver or Google Analytics.
In this section, a more specific configuration should take place as the purpose is to define the media mix for every Channel mix that will support the overall campaign. When defining the media mix you will also be able to do so by considering the marketing funnel management, specific KPIs, and budgets by the different channels in which you will distribute the strategy.

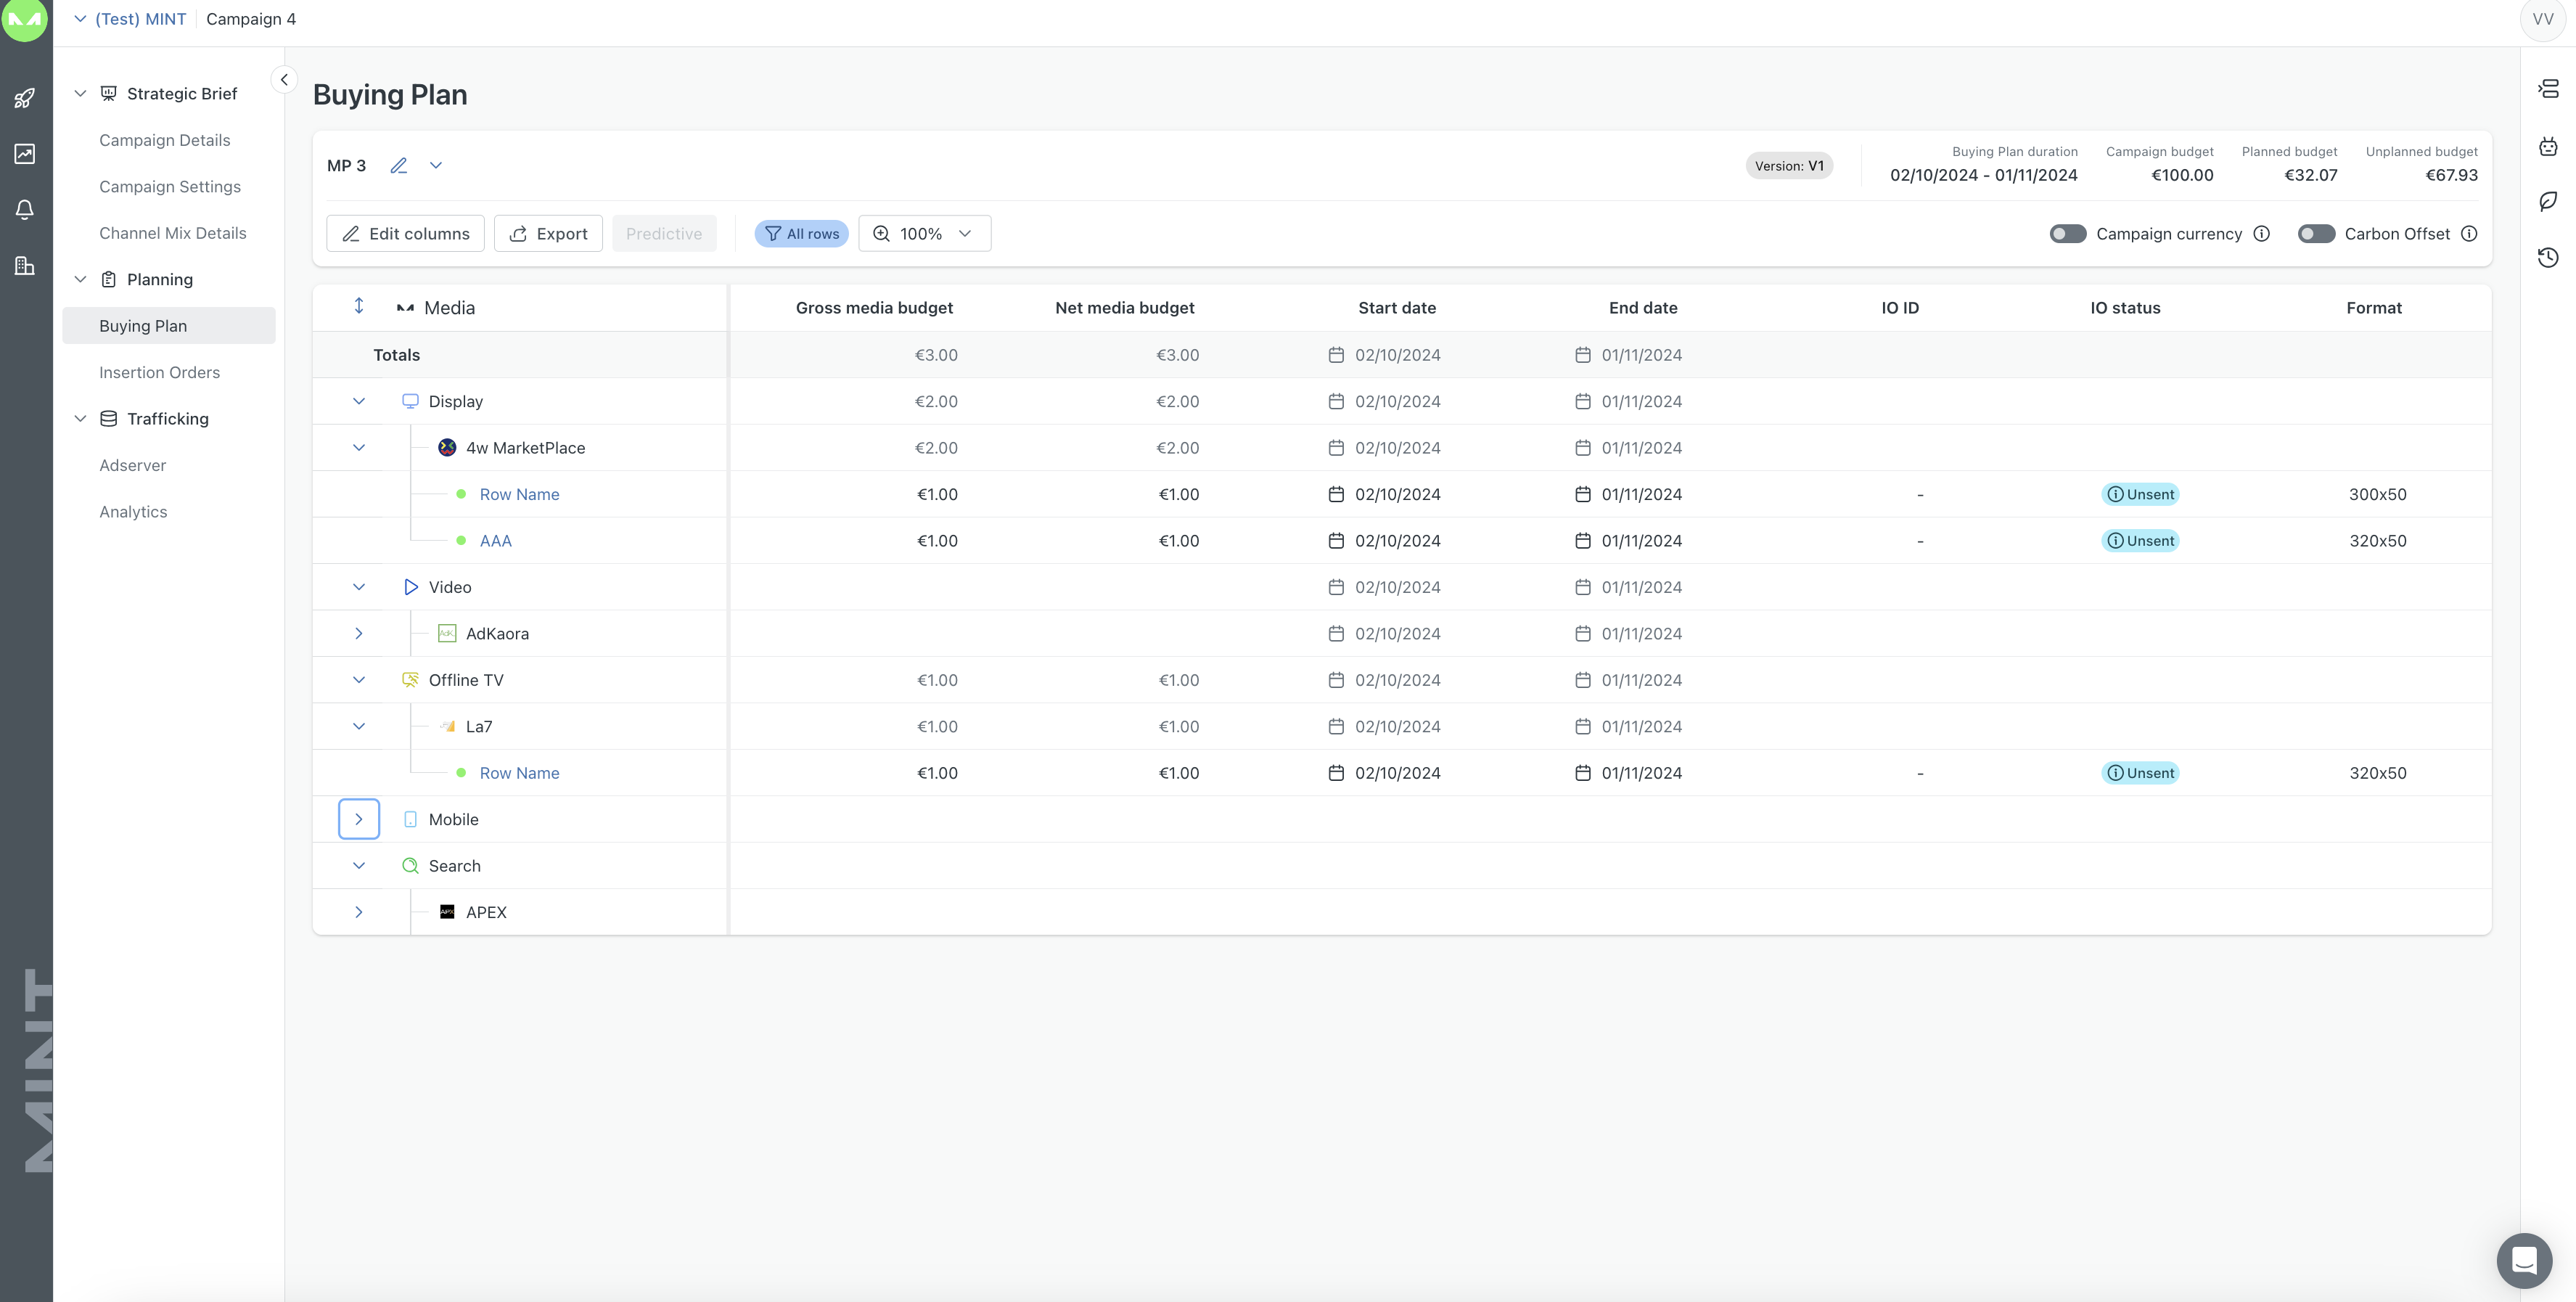
The Buying Plan is hosted in the Planning module which can be accessed from the three dots menu dedicated to every row. The Buying Plan is managed through an intuitive drag-and-drop interface. The Buying Plan creation starts in the Strategic Brief with the creation of a Channel Mix, due to the one-to-one relationship between the Channel Mix and the Buying Plan.
Channels are already included in the Channel Mix, but you can further add others while you work in the Buying Plan. The first step to customize the Buying Plan is to select the preferred platforms to work with.
As in My Campaigns, the Buying Plan consists of a type of table with different types of data including Total, Campaigns, Buying Plans, channels, platforms, and media row levels.
Next, the campaign row can be configured by allocating a media budget and selecting flight dates as well as other desired parameters like price type, price value, format, and many others. Each channel and related platform row will pick up and display overall values for flight dates, according to campaign row dates. Budgets and custom goals and parameters can be configured at media row levels; the campaign and Buying Plan levels are automatically updated as they are aggregated values.
Users are allowed to add all columns that they want, including Tech cost ones, which will be automatically calculated, and custom ones, that can be named in any way.
At the media row level, for virtual platforms, you will find a currency button that allows you to choose the preferred currency. This feature enables you to select the currency that best suits your needs for that specific media row.
The Buying Plan table can be further customized by using the Edit View option which proposes more values or metrics highlighting to the user the most usable columns and metrics.

Another feature included in the Buying Plan is the Predictive Planning, available only if there are up to 30 days of historical data. This is an automated feature that brings Artificial Intelligence into the buying planning process, providing the client with optimal budgets to spend at the media row level, to achieve desired results for a particular metric.

All you need to do is add the overall campaign budget and choose the KPI, then MINT will automatically allocate it to the configured channels and platforms. This eliminates guesswork and saves time because there is no more need to allocate manually.
The Carbon Offset option, which you find on the top-right side of the page, can be activated by clicking the toggle, and from that moment the carbon offset will be calculated for your Buying Plan. Moreover, in the leaf icon in the right side menu bar, you can access a page that presents information such as the estimated CO2 emissions and the offset cost.
Overall, this feature gives us the possibility to calculate the amount of CO2 a campaign emits and automatically pair it with climate-positive projects, ensuring the campaign runs with net-zero emissions. At the end of the Buying Plan , the client can decide to accept the offset cost to make their campaign carbon-neutral. Once accepted, our certified supplier Climate Partner will create a digital certificate indicating the amount of CO2 compensated.
You can access the versioning page to manage the Buying Plan's different versions by simply clicking on the clock/timer icon on the right sidebar, where you will find a registry of all Buying Plan versions.
You can access suggestions related to a specific campaign through the Planning section, by clicking on the small “robot” Icon on the right side of the page.
Suggestions will be available for 48 hours and then they will expire if no action has been taken.
.jpeg)
The Suggestions Data View is an option that takes you to a dedicated page to analyse in depth the data that has been considered to produce a suggestion.
All the active Suggestions will have the “Expand table below“ button visible.
.jpeg)
At the campaign row level, you can adjust the Campaign configuration that is specific to the chosen external platform.
The platforms configuration page will replicate all possible configurations available for the MAP, using API. All the features that are available and displayed on the UI are automatically updated to the MAP, by clicking the "Import" button, thanks to the API connection, with no additional manual operation needed.
The One-Way and virtual platforms configuration page is needed to have a proper mapping with AdServer, Analytics, and/or scheduled reports.
To access a Two-Ways platform's configuration page, you need to select the desired account if there are multiple accounts integrated for the same natively integrated platform (with API). The configurations can include the campaign name, total budget, or campaign flight dates. The Client specifies the overall goals the campaign should be measured against (E.g. Clicks, CTR, CPV, CPM, CPL, Likes, Conversion Rate, Completed Views, etc.)
The auto-sync feature allows MINT users to automatically synchronize campaigns and their included items in our platform. The auto-sync is performed every day at 2 am (GMT + 1).
To activate this feature, you should simply turn on the toggle in the configuration area. The auto-sync is only available for Meta, Google Ads, Microsoft Advertising, Zemanta, DV360, TikTok, LinkedIn, and Amazon DSP.

Each natively integrated external platform will come with its granular configurations, including, for example, line items for DSPs, AdSets for Meta, etc. These lower levels of configuration come with targeting, budgeting, bidding, general strategy, and ad creation options.
For One-Way and virtual platforms, clients can adjust some basic campaign configurations and create the table with the elements to be mapped in the Trafficking module and/or with the scheduled reporting.
.png)
The Bulk Action button enables users to efficiently perform a range of actions. Additionally, users have the flexibility to search by name or item date, On the top right, we have a summary of the duration and budget for the media row that will be configured.
.png)
The trafficking module allows you to connect MINT to an Ad server account and manage cross-platform ads in one place, regardless of whether we integrate natively with a specific platform or not.
The following Ad servers are currently integrated with MINT: Campaign Manager and Adform.
Moreover, it is also possible to retrieve data from Google Analytics. The module is divided into the Ad Server and Analytics sections.
You can select the preferred Ad server account from the ones that have been integrated, and then use a common campaign taxonomy to manage ads across platforms.
The page replicates the structure already defined in Planning and Configurations automatically and suggests a default configuration for placements. For the display channel platforms, you can also upload and manage ad creatives, right within MINT for Campaign Manager.
In addition, all platforms allow the configuration of conversion tags/floodlight activities, which can then become Campaign Goals and be reported on as metrics.
Choose the integration you wish to work with. By switching the toggle on at the top right, the user will have the opportunity to highlight and find unmapped rows, if they are present.
There is also a search bar available for MINT Taxonomy and Adserver Mapping.
This new integration allows you to retrieve data right from Google Analytics and map the corresponding UTM parameters to the MINT taxonomy.
By enabling Auto-tagging, you can automatically receive insight for Google Ads to optimize your campaigns and improve their overall effectiveness.
If the Auto-tagging toggle is off, you will still be able to change the grouping and fulfill the values through the bulk actions on any of the available grouping levels.
From the trafficking module in MINT, users can automatically generate both 1x1 and redirect trackers, based on their chosen naming convention. Once created, these trackers are seamlessly pushed to the integrated ad server, ensuring consistency and reducing manual effort across campaign workflows.
The first step consists in selecting the ad server account to be used, for the channels and platforms configured within the Buying Plan to be displayed. In each case, the Campaign and Site are automatically selected using the default settings in the Integration, then you can accept the default configuration for placements or select existing Ad Placements.
There is a Feedback Notification System that allows users to receive feedback on the success or failure of communication with an external platform. It indicates whether the communication was successful or not, and if not, provides a reason for the failure. This feature is primarily used for pushing data into an ad server and for pushing data into two-way platforms in specific channels.

The Suggestions Engine provides you with recommendations about how to adjust your campaigns for an optimized performance. This feature is available within the Notifications area of MINT found when clicking on the “Bell” icon on the left-side menu bar.
The Suggestions Engine supports two types of actions: Suggestions and Alerts.
Our algorithm evaluates performances, measures saturation, correlates media cost and selected targets and applies business and technical constraints to predict optimal budgets for maximum campaign performance.
Suggestions for specific Buying Plans can be found on the Buying Plan page itself by clicking on the robot icon in the right-side menu bar.
Moreover, budget suggestions will also have an impact on KPI which can be seen in every suggestion table presenting how will each KPI change if the suggestion is accepted.
The Notification Hub will give an overview of recommendations for budget and settings adjustment at various levels, such as channel, platform, campaign (Google Ads, Meta, and Microsoft Adv), and line item-ad set (DV360 and Meta).
.webp)
7.3 Alerts
In this section, you can view alerts that notify you if something is amiss with your campaigns. The page includes a date filter to narrow down the results, and you can filter alerts by Type, Campaign, and Platform.

You can accept or reject a suggestion. If accepted, budget suggestions are applied automatically to the scenario in question for the Two-Way platform, while for One-Way and Virtual platforms, suggestions need to be handled manually in the specific platforms considering MINT keeps track of these changes in-platform.
When a suggestion is rejected, we encourage users to provide feedback, so that we can improve the algorithm.
This module provides advanced cross-channel reporting that enables you to monitor the performance of each campaign, both overall and by channel.
The key features of this module include overall campaign reports as well as custom granular reports.
For Two-Way integrations, this module facilitates access to retrieved data directly from the integrated platforms, plus data retrieved from AdServer, Google Analytics, and brand safety platforms, using API thanks to the correct mapping into the Trafficking page.
For One-Way integrations, reports visualize data retrieved from scheduled reports and ingested from AdServer, Google Analytics, and brand safety platform, using API thanks to the correct mapping into the Trafficking page.
For Virtual platforms, reports visualize data retrieved from AdServer, Google Analytics, and brand safety platforms, using API thanks to the correct mapping into the Trafficking page. At the same time, is possible to add manual data in the Data Import Hub for the virtual platform so they can be considered in the Reporting module.
The Data Exploration tool of MINT simplifies data analysis and improves performance in the Reporting module, offering effortless data analysis flexibility.
Here you can create pivot tables to generate data analysis based on your specific needs, by adding Rows and Columns.
This tool enables quick and efficient data processing, allowing users to perform comprehensive analysis and monitor campaign performance.

The Dashboard tool in MINT enhances data analysis within the Reporting module, providing flexible and efficient analysis capabilities. You can easily create pivot tables tailored to your needs by adding Rows and Columns. This tool facilitates quick data processing, enabling comprehensive analysis and effective campaign performance monitoring.

The MINT AI Agent Hub is a tool designed to enhance your productivity by streamlining daily tasks. Featuring six specialized agents—Planner, Strategist, Project Manager, Supervisor, Data Analyst, and Reporting Specialist—this module offers tailored support for your needs. Easily accessible from the My Campaign page, the AI Hub is currently in V2, ensuring continuous updates for optimal performance. This powerful tool can transform your workflow and improve campaign management.

To start a conversation, type your question in the chat box at the bottom of the page. Check the suggestion cards above for tailored prompts. On the left, view your recent chats and click "New Chat" to initiate a new discussion. In the Schedule section, manage your scheduled queries and create new ones. Use the "Knowledge Base" button at the top to upload and store useful files, enhancing agent performance. The scheduling feature allows you to set queries for daily, weekly, or monthly delivery, helping you organize tasks effectively by defining a date range and specifying a chat name with a 200-character query limit.

